Author Archives: Mohamed Abd Elhamid
How to Install Configuration Manager 2012 SP1 Clients on Linux Computers
You can accomplish this installation manually. Configuration Manager does not support the use of client push installation for Linux servers.
The following scenarios are supported by the Linux clients:
- Hardware Inventory – Hardware inventory can be viewed through Resource Explorer and can be used to create collections of Linux computers.
- Software Inventory – Through hardware inventory the list of natively installed software can be gathered from Linux computers – similar to add/remove programs for Windows systems.
- Software Distribution – Deploy new software, update existing software and apply OS patches to collections of Linux computers (using a package and program). Run arbitrary maintenance scripts on a collection of Linux servers.
- Secure and Authenticated Communications.
- Consolidated Reports.
The Microsoft System Center 2012 Service Pack 1 Configuration Manager – Clients for Linux
http://www.microsoft.com/en-sa/download/details.aspx?id=36212
- Download the appropriate file for the operating system you wish to manage to a Windows computer.
- The downloaded file is a self-extracting exe and will extract tar files for the different versions of your operating system.

- Copy the install script and the .tar file for your computer’s operating system version to a folder on your Linux computer.
- Install the client using these steps:
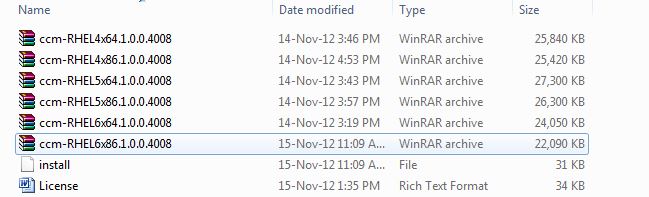
- use root credentials to run the following command to enable the script to run as a program: chmod +x insta
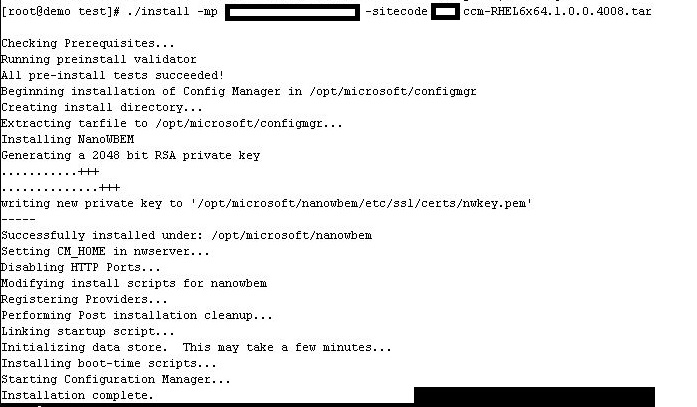
- run the following command to install the Configuration Manager client: ./install –mp <hostname FQDN> -sitecode <code> ccmRHEL5x86.tar
Step-by-step guide to Install an Additional Domain Controller by Using IFM
You can create an additional domain controller in a domain by installing Active Directory Domain Services (AD DS) on a server computer. When you are placing the additional domain controller in a remote site, you can install AD DS on the server either before or after you ship it to the remote site, as follows:
- Ship the computer as a workgroup computer, and install AD DS on it in the remote site. If you do not have administrative support in the remote site, enable Remote Desktop on the computer before you ship the computer so that you can perform the installation remotely. In the remote site, you can either:
- Install AD DS from installation media that has been shipped to the site on removable media.
- Install AD DS over the network.
- Install AD DS on the server in a hub or staging site, and then ship the installed domain controller to the remote site.
– Windows Server 2008 and Windows Server 2008 R2 include an improved version of the Ntdsutil tool that you can use to create installation media for an additional domain controller. You can use Ntdsutil.exe to create installation media for additional domain controllers that you are creating in a domain. The IFM method uses the data in the installation media to install AD DS, which eliminates the need to replicate every object from a partner domain controller.
Note:– Objects that were modified, added, or deleted since the installation media was created must be replicated. If the installation media was created recently, the amount of replication that is required is considerably less than the amount of replication that is required for a regular AD DS installation.
Advantages of using IFM to install a domain controller in a remote site:- You can reduce the replication traffic that is initiated during the installation of an additional domain controller in an Active Directory domain. Reducing the replication traffic reduces the time that is necessary to install the additional domain controller.
- You can install many domain controllers from a single source of installation media.
- You do not have to disconnect a functioning domain controller from the replication topology. Therefore, you can avoid the disadvantages that are associated with a domain controller that does not replicate.
- You can avoid having to either replicate the entire Active Directory replica over a wide area network (WAN) link or disconnect an existing domain controller while it is being shipped to the remote site.
- If you enable Remote Desktop on the server before you ship it, you do not have to employ an administrator with Domain Admins credentials in the remote site. You can also use Remote Server Administration Tools (RSAT) to manage AD DS remotely.
- You cannot use IFM to create the first domain controller in a domain. A Windows Server 2008–based domain controller must be running in the domain before you can perform IFM installations.
- The media that you use to create additional domain controllers must be taken from a domain controller in the same domain as the domain of the new domain controller.
- If the domain controller that you are creating is to be a global catalog server, the media for the installation must be created on an existing global catalog server in the domain.
- To install a domain controller that is a Domain Name System (DNS) server, you must create the installation media on a domain controller that is a DNS server in the domain.
- To create installation media for a full (writable) domain controller, you must run the ntdsutil ifm command on a writable domain controller that is running Windows Server 2008 or Windows Server 2008 R2.
- To create installation media for a read-only domain controller (RODC), you can run the ntdsutil ifm command on either a writable domain controller or an RODC that runs Windows Server 2008 or Windows Server 2008 R2. For RODC installation media, Ntdsutil removes any cached secrets, such as passwords
- You can use a 32-bit domain controller to generate installation media for a 64-bit domain controller; the reverse is also true. The ability to mix processor types for IFM installations is new in Windows Server 2008 and Windows Server 2008 R2.
- The IFM process creates a temp database in the %TMP% folder. You need at least 110% of the size of the AD DS or AD LDS database free on the drive where the %TMP% folder is in order for the operation to succeed. You can redirect the %TMP% folder to another disk on the server in order to use more space.
The following tools are required to perform the procedures for this task:
- Ntdsutil.exe
- Dcpromo.exe
- Robocopy.exe
- Enable Remote Desktop on the destination server
- click Start. In Start Search, type Command Prompt.
- right-click Command Prompt, and then click Run as administrator
- At the command prompt, type the following command, and then press ENTER:
Ntdsutil
- At the ntdsutil prompt, type the following command, and then press ENTER:
activate instance ntds
- At the ntdsutil prompt, type the following command, and then press ENTER:
ifm
- At the ifm prompt, type the command for the type of installation media that you want to create, and then press ENTER. For example, to create installation media for a writable domain controller with SYSVOL, type the following command:
create sysvol full <Drive>:\<InstallationMediaFolder>


![]()
You can save the installation media to a network shared folder or to removable media. The IFM process creates a temp database in the %TMP% folder. You need at least 110% of the size of the AD DS or AD LDS database free on the drive where the %TMP% folder is in order for the operation to succeed. You can redirect the %TMP% folder to another disk on the server in order to use more space.
Important If you create installation media with SYSVOL, use Robocopy.exeto copy the installation media from where it is saved to the destination domain controller that you want to add to the domain. To copy the installation media with SYSVOL to a destination domain controller- click Start. In Start Search, type Command Prompt.
- right-click Command Prompt, and then click Run as administrator.
- At the command prompt, type the following command, and then press ENTER:
robocopy.exe /E /COPYALL <source location> <destination location>
Example:
robocopy.exe /E /COPYALL c:\InstallationMediaFolder \\RODC01\IFM
Important : The next steps are required to change the SYSVOL folder security settings. These steps change the file hash, which will become the same file hash as in the IFM. If you use DFS Replication, SYSVOL will keep the presided data only if the file hash on the source domain controller and the destination server are the same- On the destination server, right-click the SYSVOL folder, and then click Properties.
- Click the Security tab, and then click Advanced.
- Click the Auditing tab, and then click Edit.
- Clear the Include inheritable auditing entries from this object’s parent check box, and then select it again.
- Click Apply, and then click OK.


- Click Start, and then click Server Manager.
- In Roles Summary, click Add Roles.
- Review the information on the Before You Begin page, and then click Next.
- On the Select Server Roles page, click Active Directory Domain Services, and then click Next.
- Review the information on the Active Directory Domain Services page, and then click Next.
- On the Confirm Installation Selections page, click Install.
- On the Installation Results page, click Close this wizard and launch the Active Directory Domain Services Installation Wizard (dcpromo.exe).
- Select Use advanced mode installation.
- Select the install from media option and provide the location of the installation media.
- The Source Domain Controller page appears. Click Let the wizard choose an appropriate domain controller or click Use this specific domain controller to specify a domain controller that you want to provide as a source for replication to create the new domain controller, and then click Next. If you do not choose to install from media, all data will be replicated from this source domain controller.
- After the installation operation completes successfully and the computer is restarted, remove the folder that contains the IFM media from the local disk.
- On the Operating System Compatibility page, review the warning about the default security settings for Windows Server 2008 domain controllers, and then click Next.
- Click Existing forest, click Add a domain controller to an existing domain, provide the user name and password for an account that can install the additional domain controller.
- Select the domain of the new domain controller, and then click Next.
- Select a site from the list or select the option to install the domain controller in the site that corresponds to its IP address, and then click Next.
- Make the following selections, and then click Next.
- type or browse to the volume and folder locations for the database file, the directory service log files, and the SYSVOL files, and then click Next.
- On the Directory Services Restore Mode Administrator Password page, type and confirm the restore mode password, and then click Next. This password must be used to start AD DS in Directory Services Restore Mode (DSRM) for tasks that must be performed offline.
- On the Summary page, review your selections. Click Back to change any selections, if necessary.
- On the Completing the Active Directory Domain Services Installation Wizard page, click Finish.
- You can select Reboot on completion to have the server restart automatically, or you can restart the server to complete the installation of AD DS when you are prompted to do so.
How to configure an Open With preference group policy item
بسم الله الرحمن الرحيم
What is the use from open with item in group policy preference? The Open With preference item allows you to create, configure, and delete an Open With association with a specific file name extension.- Click Start – All programs – Administrative Tools – Group Policy Management.
- Create or Edit Group Policy Objects.
- Expand User Configuration – Preferences – Control Panel Settings.
- Right-click the Folder Options node, point to New, and select Open With.


- In the New Open With Properties dialog box.
– Create Create a new Open With association. If a file name extension in the Open With item exists within the user’s profile, then the new association is not created.
– Delete Remove an existing Open With association. An association exists when the file name extension in the Open With item exists within the user’s profile. No action is performed if the association does not exist.
– Replace Delete and recreate an Open With association. The net result of the Replace action overwrite all existing settings associated with the Open With association. If the Open With association does not exist, then the Replace action creates a new Open With association.
– Update Modify an Open With association. The action differs from Replace in that it updates the settings defined within the preference item. All other settings remain as they were previously configured. If the Open With association does not exist, then the Update action creates a new Open With association.
Open With settings:– File name extension Type the extension of the file to associate with the specified application. Press F3 to display a list of variables from which you can select.
Note: You do not need to insert the period before the file name extension.
– Associated Program Type the path and name of the application you want to associate with the file name extension. Alternatively, you can click Browse (…) and select the application. Press F3 to display a list of variables from which you can select.
Note: Even if the app is not installed on the server where you’re editing policy, you can manually type in the full path to the .exe as it would exist on the client. Or, you can install the Remote Server Administration Tools (RSAT) on one of your Win7 machines where the app is installed and edit the GPO from there.
– Set as default Select this check box to make the associated application the default application Windows uses to open the file name extension.
Reference: http://technet.microsoft.com/en-us/library/cc732272.aspx http://social.technet.microsoft.com/Forums/en-US/winserverGP/thread/7c8b7f12-510a-435a-8053-856123cdb20d/Group policy search tool (GPS)
بسم الله الرحمن الرحيم
GPS is a online group policy search tool for Microsoft Active Directory Group Policy Settings.
You are unsure whether a policy for your setting exists. you have ever tried to find the registry setting for a specific group policy setting.
With the help of Group Policy Search you can easily find existing Group Policies and find the registry setting for a specific group policy
Group Policy Search will give you what you need. Try it Here
- GPS page overview

- You can change the display and search language

- You can change Tree view (policy view or Registry view)


- You can filter the search to specific products and/or versions

- You can share using the one-click copy feature in the copy menu

- You can add a Search Provider and a Search Accelerator for your Internet Explorer or a Search Connector for your Windows 7
 Reference:
How to Repair Windows System Files with System File Checker (SFC)
بسم الله الرحمن الرحيم
What is System File Checker (SFC)?
System File Checker is a utility in Microsoft Windows that allows users to scan for and restore corruptions in Windows system files like DLL files. This utility is available in all Windows family of operating systems.
In Windows 7, System File Checker is integrated with Windows Resource Protection, which protects registry keys and folders as well as critical system files.
How to use SFC
1- Start – Search – type Cmd – right click Cmd icon and run as administrator

2- Type SFC /Scannow then Enter

Important:
- You must run Command Prompt as an administrator in Windows 7.
- If it finds a problem, it will attempt to replace the problematic files from the DLL Cache
- If the file is not in the DLL Cache or the DLL Cache is corrupted you may need access to your original Windows DVD to allow file repairs.
- To repair important Windows files usually takes 5 to 10 minutes.
- May be prompt you to restart.

3- When the scan is complete. The log file was generated in the path
C:\Windows\Logs\CBS\CBS.log

How to install Windows 8 Developer Preview
بسم الله الرحمن الرحيم
– What is Windows 8 Developer Preview?The Windows 8 Developer Preview is a pre-beta version of Windows 8 for developers and testers.
System RequirementsThe Windows 8 Developer Preview works great on the same hardware that powers Windows Vista and Windows 7:
- 1 gigahertz (GHz) or faster 32-bit (x86) or 64-bit (x64) processor
- 1 gigabyte (GB) RAM (32-bit) or 2 GB RAM (64-bit)
- 16 GB available hard disk space (32-bit) or 20 GB (64-bit)
- DirectX 9 graphics device with WDDM 1.0 or higher driver
- Taking advantage of touch input requires a screen that supports multi-touch
- To run Metro style Apps, you need a screen resolution of 1024 X 768 or greater
1- Download Windows 8 Developer Preview from here
2- Burn iso file to DVD or we can install it in VMware Workstation 8 but when select system you will choose windows 7 because VMware
Workstation 8 not support Windows 8 Developer Preview directly )
3- boot from DVD.
4- After booting.

5- Select your Language, Time and Currency Format and Keyboard or input method.
 6- You can select Upgrade or Custom (i prefer custom)
 7- select partition and click next.


8- Just wait untill installing finshed and system restarting

9- Type computer name and click Next.

10- Click Express Settings or Customize.


11- There are two ways to use an account in Windows 8 Windows Live Account or Local account we will select local account
 12- Type account and password

13- This Metro UI Appearance click Desktop Icon to go your Desktop
Metro UI fantastic with touch screen
How to Prevent Authenticated Users from joining Workstations to a Domain
بسم الله الرحمن الرحيم
I asked myself what is benefit from this option “by default, Windows Server allows authenticated users to join 10 machine accounts to the domain”. But I didn’t get an answer
Administrator can control it with two ways:
1-By Adsiedit:
- Start – Administrative Tools – ADSI Edit
- Right click Domain Name – Properties
- Attribute Editor Tab – ms-DS-MachineAccountQuota – Click Edit – set to 0 –press ok


Note:
That users in the Administrators or Domain Administrators groups, and those users who have delegated permissions on containers in Active Directory to create and delete computer accounts, are not restricted by this limitation.
2-By Group Policy:
- Click Start – All programs – Administrative Tools – Group Policy Management.
- Create or Edit Group Policy Objects.
- Expand Computer Configuration – Policies – Windows Settings – Security Settings – User Rights Assignment
- From right pane right click on Add workgroup to domain – Properties – Add User or Group or remove unwanted user or group


How to configure AppLocker Group Policy to prevent software from running
بسم الله الرحمن الرحيم
Firstly: What is AppLocker?
AppLocker is a set of Group Policy settings that evolved from Software Restriction Policies, to restrict which applications can run on a corporate network, including the ability to restrict based on the application’s version number or publisher.
- Click Start – All programs – Administrative Tools – Group Policy Management.
- Create or Edit Group Policy Objects.
- Expand Computer Configuration – Policies – Windows Settings – Security Settings – Application Control Policies – AppLocker .
- In right pane click on Configure rule enforcement

Note:
-
Executable rules: .exe, .com
-
Windows Installer rules: .msi, .msp
-
Scripts rules: .ps1, .bat, .cmd, .vbs, .js
- Under Executable rules check configured box and select Enforce rules then click ok

- In left pane under AppLocker right click on Executable Rules then select Create New Rule
- Select Deny and select what user or group will prevent.


Note:
Publisher rules: This condition identifies an application based on its digital signature and extended attributes. The digital signature contains information about the company that created the application (the publisher). The extended attributes, which are obtained from the binary resource, contain the name of the product that the application is part of and the version number of the application.
Path rules: This condition identifies an application by its location in the file system of the computer or on the network.
File hash: This condition identifies an application which is not digitally signed can be restricted by a file hash rule instead of a publisher rule.
- Select Publisher and click Next

- Click browse then select executable file example.exe
- Choose any options from prevent with any publisher, publisher, product name, file name and file version then click Next.

- Read it and click Next

- Click Create

- You will now be prompted to create some default rules that ensure that you don’t accidently stop Windows from working. Click “Yes” to this if you don’t already have these rules created.


Note:
If you want to apply this role on computer administrator then right-click on the BUILTIN\Administrators rule and click Delete

Now we will active the Application Identity service to enable AppLocker on the computers
- In the same Group Policy Object you were just editing Computer Configuration – Policies – Windows Settings – Security Settings – System Services
- Right click Application Identity service then properties
- Check Define this policy setting box and Automatic then OK.


Now when users try run program he will get this

Reference:
http://www.windows7library.com/blog/security/applocker-part-2-understanding-applocker-rules/
How to force proxy settings via group policy
بسم الله الرحمن الرحيم
This article describes how to force proxy settings via group policy.
- Click Start – All programs – Administrative Tools – Group Policy Management.
- Create or Edit Group Policy Objects.
- Expand User configuration – Policies – Windows Settings – Internet Explorer Maintenance – Connection.
- In right Pane Proxy Settings.

For some security reasons maybe administrator need to prevent end users from change their proxy settings
You can do it with group policy follow this steps:
- Click Start – All programs – Administrative Tools – Group Policy Management.
- Create or Edit Group Policy Objects.
- Expand Computer Configuration – Administrative Templates – Windows Components – Internet Explorer – Internet Control Panel
- In right Pane Disable the Connections page (Enabled)


How to Find the MAC Address
بسم الله الرحمن الرحيم
This article describes a quick method to find the MAC Address(Media Access Control).
1- What is MAC Address ?
– A Media Access Control address (MAC address) is a unique identifier assigned to network interfaces
for communications on the physical network segment.
2- What is ARP?
– Address Resolution Protocol (ARP) is the protocol that maps Ethernet MAC address to IP address.
To determine the MAC address of computer:
start – Run – type ARP -a (local computer IP)
Note : If you not determine the IP the command will give you MAC Address for all subnet network.
